|
|
Home RabidHaMsTeR.org | PREDEFINED SCENE TUTORIAL for R2/Extreme |
|
This should give you a (very quick) start to making predefined scenes in R2/Extreme 1.50 (and on)... I suggest you read the formula engine tutorial first. Intro In R2/Extreme 1.50 and onwards, you can combine R2's 'basic' scenes in any way you want. It does this via a series of commands. There are 3 types : Clear Screen (C) - just clears the screen - done automatically at the start of each draw anyway Render (R) - Renders a scene either to the screen or to a texture (beware: rendering to a texture corrupts the screen) Formula (F) - This allows *any* of R2's variables to be changed for the drawing of the predefined scene - they are restored afterwards. Predefined scenes are stored in the "WinAmp\Plugins\R2e\Data" directory in files with the extension '.predefine'. On startup, R2e loads all of the .predefine files. These are available as scenes numbered from '-1' downwards. Starting... Obviously you're going to want to check how your scene looks, and you don't want to have to wait until it comes up, so its an idea to do the following: Start R2e, go to the Console, and type the following: bind([vk_f8],[scenechange(-1);timerclear([scene])]) This will make the F8 key change to the first custom scene, and then stop the scene from changing... Now, exit R2/Extreme, and in the 'R2e\Data' directory create another directory called 'Temp', and move all the .predefine files into this. Now once you've created a predefine file, you can start R2e, hit F8, and it will immediately display the last predefined scene in your file. Right... all you have to do is make a predefine file. Open Notepad, and type in the following: [MAIN] COUNT=1 [1] Name=My Example Author=Gordon Williams Pref=10 Count=2 A0=Fcontour.ypos=0.44; A1=RCONTOUR Feel free to replace the name and Author ;) In Notepad, click save as, select the R2e\Data directory, and type 'My Example.predefine'. If you start R2Extreme now and hit F8 after its loaded, a rainbow-coloured plasma should appear.  About predefined scenes About the best thing I can do now is explain what all the bits of the file do... At the start, "COUNT" under the "[MAIN]" heading specifies how many predefined scenes there are. At the moment there is just one, and this is under the "[1]" heading. Under this heading, "Name=" is just the name of the scene that appears in the options menu, and "Author=" is just your name. "Pref=10" specifies the preference for this scene (as in the R2e preference menu) please set this to 10 if you distribute your predefined scene, because setting it to 1000 is just gonna piss people off :) Next, there's "Count=2"... this says that there will be two things to do, starting from "A0". If there was "Count=5" we would have "A0=" up to "A4=". under each of the A#'s there a line, the first character of which specifies what it does. "A0=C" would just clear the screen, but "A0=F..." says that the rest of the line is a formula. In the same way, "A1=RCONTOUR" says the rest of the line is a render command. rendering the scene with the ID "CONTOUR" The Formula part is setting the scene variable "ypos" in the "countour" scene so that it displays a rainbow instead of black and white. In R2e, go to the "scene selection" menu and select the one marked "contours". Go to "change scene options" in the pop-up menu and you'll see a scrollbar and value marked "ypos". Fiddling with it should change the colour of the contours, and you'll see setting it to about 0.44 (as in the formula) makes a rainbow. Now set it back to where the red dot is so its faded black and white... Now to do something only slightly more interesting. The plan is just to draw the hypermorph on top of the plasma. To do this, all we need to do is add another line labelled "A2" and increate "Count" to 3, but we're going to make another predefined scene in this file, so change "COUNT=1" under "[MAIN]" to "COUNT=2" and then copy and paste everything from "[1]" to "A1=...." down below, renaming this "[1]" to "[2]"... Now, increase the "Count=2" line to "Count=3" and add the line "A2=RHYPERMORPH" to the end of the file. It should now look like this: [MAIN] COUNT=2 [1] Name=My Example Author=Gordon Williams Pref=10 Count=2 A0=Fcontour.ypos=0.44; A1=RCONTOUR [2] Name=My Example 2 Author=Gordon Williams Pref=10 Count=3 A0=Fcontour.ypos=0.44; A1=RCONTOUR A2=RHYPERMORPH Save the file, and run R2e, then hit F8. It looks kindof Ok, but wouldn't it be nice if the hypermorph reflected the background? 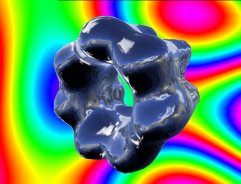 Well, thats very possible, but the hypermorph can only use textures for reflections, so we must render the background to a texture. We have a problem here, because we can't draw the background to a texture and to the screen at the same time. We have either: A) render the plasma to a texture, and then draw the background from the texture, or B) Draw the plasma once into the texture, and again onto the background. The second method is slightly slower is some circumstances (when the scene is complex), but I'm going to use it for now, since we can make the background black and while while the hypermorph is a rainbow... add the text below to end end of the file, and increase "COUNT=2" up the top to "COUNT=3". I'll explain what it does in a moment. [3] Name=My Example 3 Author=Gordon Williams Pref=10 Count=5 A0=Fcontour.ypos=0.44;hypermorph.cubemap=0;hypermorph.tex0=-1; A1=RCONTOUR,1 A2=Fcontour.ypos=0.56; A3=RCONTOUR A4=RHYPERMORPH Ok... this one is slightly longer, so i'll go through what it does, step by step: A0 : contour.ypos=0.44; - Set the contour to display a rainbow set of colours - as before. hypermorph.cubemap=0; - Tell the hypermorph not to use a cubemap for the reflection, and instead use a texture. There is only one cubemap in R2e, and this can not be altered. hypermorph.tex0=-1; - Set up the hypermorph to use the dynamic texture number #1. dynamix textures in scenes are numbered from -1 down to -4. Positive numbers are reserved for textures that don't change. A1 : Renders the contour scene. The ",1" means render it to dynamic texture #1. A2 : contour.ypos=0.56; - Set the contour to display black and white stripes - this is the default value anyway, but since we changed it, we have to put it back. A3 : Renders the contour scene. There is no ",1" so its just rendered straight to the screen (and in black and white because we changed the options. A4 : Render the hypermorph scene - we told it to use the dynamic texture earlier, so it will now render using the rainbow. 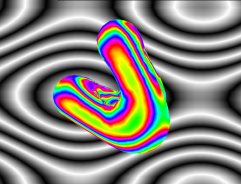 Now if you run R2e you should see something like the image above. We still haven't used the formula engine except to put in static numbers though... on the end of the "A0=" line, put the text "contour.amt=bass/3;". This will take the bass value, which hangs around 1, and goes up and down quite a load, divide it by 3, and put it into the "amt" variable of the contour scene. If you fiddle with this in R2e while displaying the contour scene, you'll see it varies the amount of contours. If you save and run R2e now, you'll see that when there is a drum beat, you get way more contours. Scene Masking Scenes such as Blit, Warp, and Contour have a variable called Type. This takes a value from 0 to 5, and defines the way the image is put on the screen. This is what each value does: 0 Put over the top of the background with transparency A 1 Add to the background - A determines amount to add 2 Colour-key. if dark the background gets through - if light the scene gets through 3 Mask from Scene - if scene bright then background is shown, else black 4 Mask with background - if background is bright then the scene gets through 5 If the scene is white it inverts the background. If its black it leaves it alone Put the code below in, and make "COUNT=4"... [4] Name=My Example 4 Author=Gordon Williams Pref=10 Count=3 A0=Fcontour.ypos=0.44;contour.type=4; A1=RFRACTCUBE A2=RCONTOUR This is pretty simple code again - it sets up the contour to a rainbow, and sets it to mask itself with the background. It then draws a fractal cube (not that the fractal cube it actually yellowish, so the masking is going to be a bit wierd) and finally draws the contours over the top, with the masking. It should look like the image below: 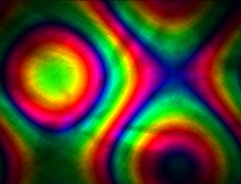 Its probably worth fiddling around with contour.type, and see what each different thing does. Using Scenes Basically, in R2e, you can use any basic (one with an icon) scene to draw stuff. You can also change textures on a lot of them to display another scene, or some other texture. Some scenes can use cube-mapping (hypermorph, watermorph, cubefield2, etc.) and if this is turned on they will ignore the texture value. To use a scene, you have to find out its ID. Basically go to the scene in R2, and go to the scene options menu. The title of this menu is the scene's ID. To make an effect, its an idea to display the scene on its own, with the options window up, and fiddle around until you get what you want. Make a note of the values and set them up in your code. I would replace the values to their defaults after you've figured out what needs changing because otherwise your standard R2e scene will look messed up too Remember you can use formulii that use the "Bass", "Time" and "BassTime" variables to change stuff in time with the music (have a look at the point morph tutorial - it uses them a bit more there), but DONT alter any values that are red in the scene options menu - this means the scene needs to be restarted, and it will screw up badly if you change them. The BLIT and WARP scenes tend to be used a lot in effects. BLIT would be used just for drawing another scene in the background after maybe you did something to it with textures. It also lets you set the red, green and blue values, so you can tint stuff. WARP is much the same, but you can change variables like warp.samp,warp.soffset and warp.sfreq with bass to make scenes or logos 'pump'. I added a bit to the geiss effect that lets you render textures into it - it kindof works, but some scenes will just 'white out'. Other stuff Well, hope that was sortof enough to get started... If you have any queries, please raise them on the R2 effects messageboard and i'll see if I can help you. Please look at the other .predefine files to see how things have been done - its the best way to learn. if you come up with any cool stuff, please mail it to me - i'd like to see them and i could stick them in the next R2e release/put them on the website. |
| site design by Gordon Williams |